Icon Libraries
Extending the set of icons available for use in the game’s sign, map stamps, and map icon system requires creating an Icon Library data asset. Adding new icons is a relatively straightforward process but there are some considerations to be made.
This page walks through creating an Icon Library, adding icons to it, and editing it as your mod evolves.
|
The game’s icon library system is originally designed to be used with an editor tool that is not available to modders. As such, many of the warnings and mentioned in the headers (and field hover tooltips) are not relevant to modders. Disregard the tooltips' warnings, but be sure to read the warnings and notes posted on this page. |
|
A base-game bug prevents custom icon libraries from working on modded dedicated servers. This bug is expected to be resolved in the Satisfactory 1.1 update. |
Setup
Before getting started you will need to add some Access Transformers. The game’s icon library system has a couple safeguards to avoid icon ID conflicts, but we must turn off these safeguards to add modded icons in our own libraries.
Add the following to your mod’s AccessTransformers.ini:
[AccessTransformers]

; Custom FGIconLibrary
EditAnywhere=(Class="/Script/FactoryGame.IconData", Property="ID")
EditAnywhere=(Class="/Script/FactoryGame.IconData", Property="IconType")
EditAnywhere=(Class="/Script/FactoryGame.IconData", Property="ItemDescriptor")
EditAnywhere=(Class="/Script/FactoryGame.IconData", Property="DisplayNameOverride")
Create the Icon Library Data Asset
A data asset needs to be created to hold all the information about the icons you are adding.
Create a data asset using the Content Browser by right-clicking on empty space in your mod’s Content folder, hovering over Miscellaneous and selecting Data Asset.
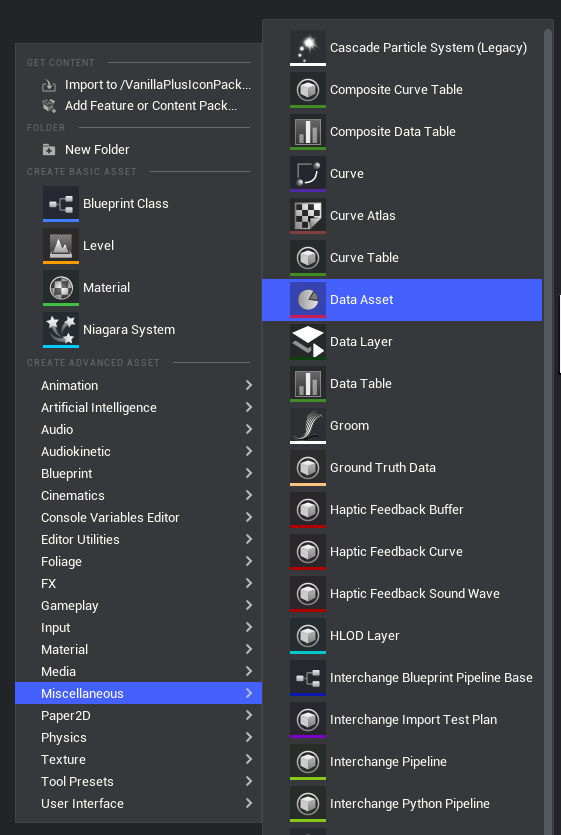
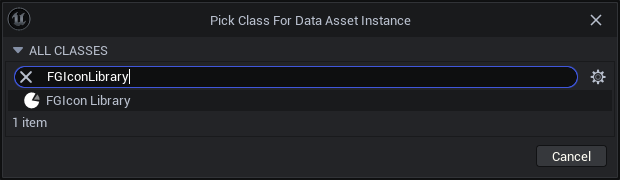
Then select FGIconLibrary as the Data Asset Class
Place the asset wherever you’d like in your mod’s files. The game’s Icon Database Subsystem will automatically detect and load it.
Importing Icon Images
You will need to import images to be used as icons if they aren’t already part of your mod.
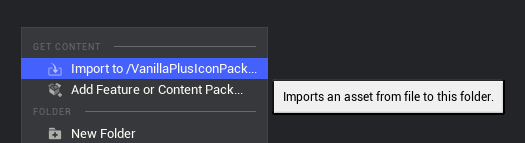
To do this simply right-click on an empty space again and this time select Import to /[YourModReference], then use the file browser to select your image(s).
Some Texture settings can be set to match Vanilla icons.
In the Level Of Detail section:
-
Mip Gen Settings =
FromTextureGroup` -
Texture Group =
UI Streamable
In the Compression section:
-
Compression Settings =
Default (DX11/…)
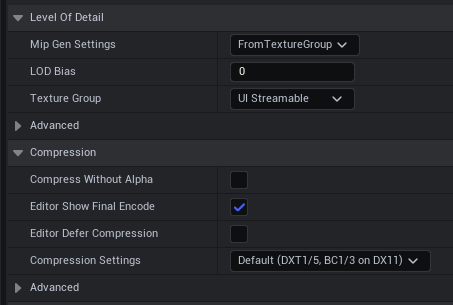
Everything else can be left as the default from when it was imported.
Image Considerations
There are a couple things to keep in mind for your images:
-
Images should be square. Signs will stretch images into a square so if you want it to show correctly make sure you crop it to a square before importing.
-
PNGs with alpha backgrounds work best. Vanilla icons have alpha backgrounds, so to best match the vanilla style yours should have that as well.
Filling out the Data Asset
Upon opening the data asset you will see several different arrays you can add icons to. No matter what type of icon you are adding you will want to use M Icon Data. If you add your icon in one of the other arrays it will not show in-game.
Add a new element to M Icon Data, it should look like this:
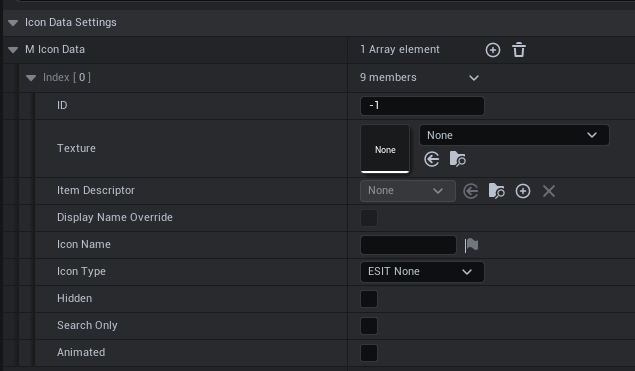
| Field | Description of Function | ||
|---|---|---|---|
ID |
Each of your icons requires a unique, non-negative ID. For ease of editing, start at 0 and use the same number as the array index.
|
||
Texture |
Required. The texture (or material instance) to use for the icon. |
||
Item Descriptor |
Optional. If you want to duplicate the name of an item or building, select its descriptor here. |
||
Display Name Override |
When checked, the |
||
Icon Name |
The user-facing icon name to use for the icon. Required, unless an
|
||
Icon Type |
Required. Controls the category the icon is sorted into in-game,
and if it’s treated as a map stamp icon.
Set this to something other than |
||
Hidden |
When checked, the icon will not be available for selection in-game. Use this if you want to remove an icon from the library instead of deleting its array entry. |
||
Search Only |
When checked, this icon will only appear when searched for directly. |
||
Animated |
see Animated Backgrounds for more information. |
Adding and Removing Icons
To add new icons, simply add new array elements and ensure they have unique IDs.
|
When removing icons from your library, use the Hidden field instead of removing them! Although it’s possible to remove array entries, this is highly discouraged as it could result in you accidentally re-using an ID later.
Re-using an ID will cause users' signs to unexpectedly change from the old icon to the new icon.
Instead, it is recommended to simply leave the array entry in place and enable the |
Finishing Up
To test your icon library, package the mod and build a sign to see if your icons are showing up.
Check out Example Mod’s ExampleModIcons if you’re having trouble getting your icon library settings to work.
Special Icon Types
This section provides some additional notes about specific Icon Type values.
Animated Backgrounds
It is possible to add new animated backgrounds.
Look at FactoryGame/Interface/UI/InGame/Signs/SignBackgrounds for some examples of settings for animated backgrounds.
| Animated icons will only animate when used as a background, and all backgrounds are automatically made grayscale when selected in-game. |